Kubernetes Cluster on AWS EC2 with kubeadm: A Hands-On Guide
Building a Kubernetes cluster on bare EC2 instances is a solid way to learn how the control plane and workers communicate, how networking is configured, and how to lock down access with security groups. This guide walks through a 3-node cluster (1 control plane, 2 workers) using kubeadm, containerd, and Flannel on Amazon Linux 2023.
What You Will Build
| Component | Count |
|---|---|
| Control plane (master) | 1 |
| Worker nodes | 2 |
| CNI | Flannel |
| Container runtime | containerd |
| Bootstrap tool | kubeadm |
Cluster layout:
                                +---------------------------+
                                |        Master Node        |
                                |       Control Plane       |
                                |  (API, etcd, scheduler)   |
                                |                           |
                                +------------+--------------+
                                             |
                                Kubernetes API (TCP 6443)
                                             |
                       +---------------------+---------------------+
                       |                                           |
          +------------+------------+            +-----------------+-----------+
          |      Worker Node 1      |            |     Worker Node 2           |
          |       (workloads)       |            |      (workloads)            |
          +-------------------------+            +-----------------------------+

           ---- EC2 Instance B ----                ---- EC2 Instance C ----
All nodes run on AWS EC2. Networking between control plane and workers is restricted using security groups so only required ports are open. The official reference for required ports is the Kubernetes documentation: Ports and Protocols.
Choosing an AWS Region and Instance Placement
Before provisioning instances, choose a region that minimizes latency for your users or your own access. A simple way to measure this is to use cloudping.info.
- Open cloudping.info in your browser.
- Click HTTP Ping to measure round-trip time from your browser to AWS (and other cloud) regions.
- Review the Latency column for each region (e.g.
us-east-1,eu-west-1,ap-southeast-1).
Regions with lower latency are better for interactive use (e.g. kubectl) and for serving traffic to users in that geography. The table shows latency from one location to several AWS regions; your results will vary by where you (or your users) are.
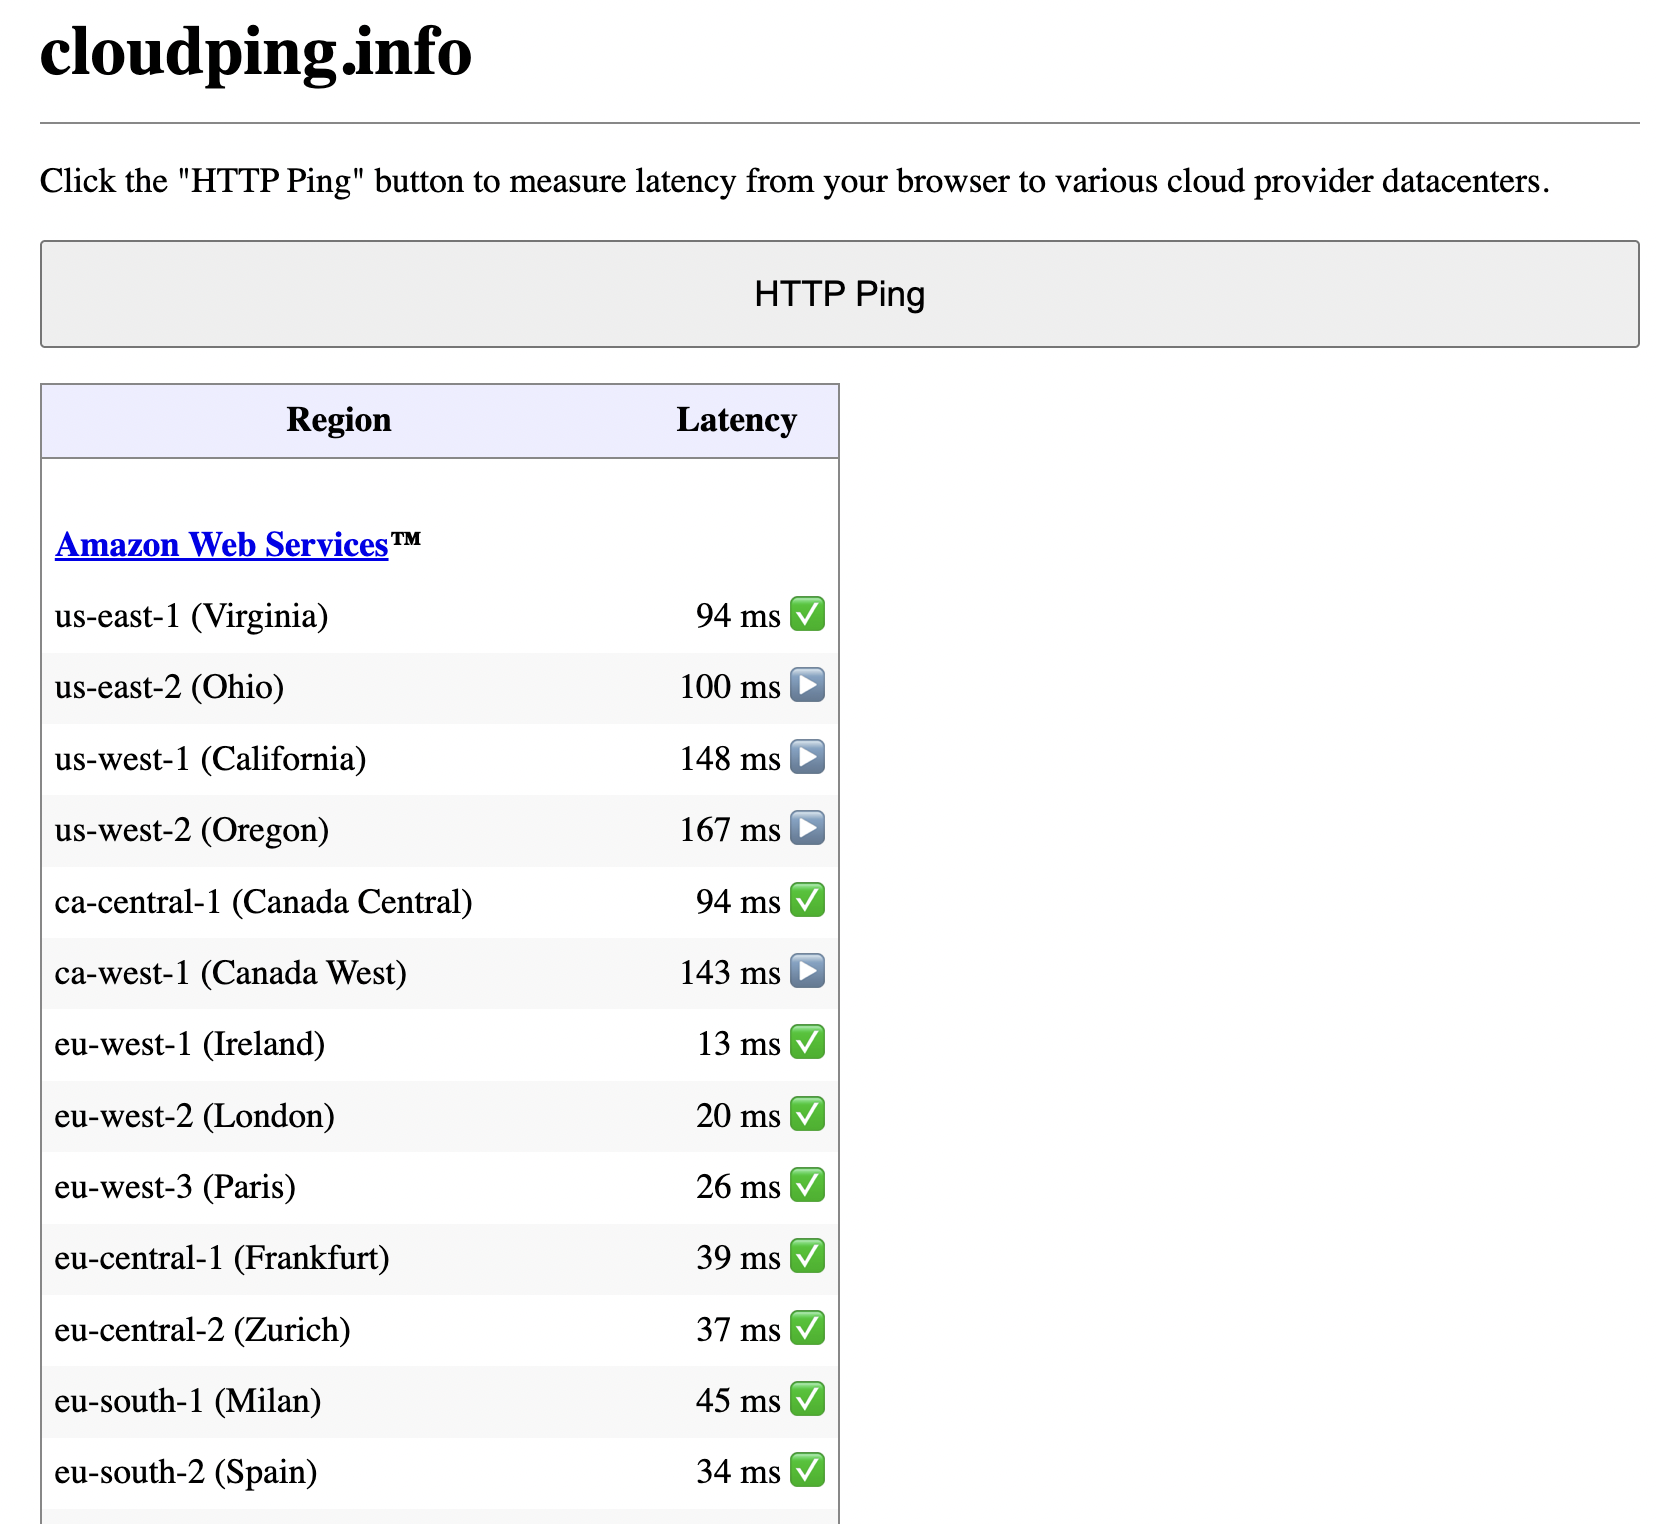
Example: HTTP ping results from cloudping.info to AWS regions.
For a learning cluster, pick one region and launch all EC2 instances (master and workers) in the same region and, ideally, the same VPC so node-to-node communication stays fast and simple.
Infrastructure Overview
EC2 Instances
| Node | Role | Instance type | OS | Root disk |
|---|---|---|---|---|
| master | Control plane | t3.micro | Amazon Linux 2023 | 30 GB |
| worker01 | Worker | t3.micro | Amazon Linux 2023 | 30 GB |
| worker02 | Worker | t3.micro | Amazon Linux 2023 | 30 GB |
Use private IPs for cluster communication (e.g. kubeadm join). In the examples below, replace MASTER_PRIVATE_IP and worker IPs with your actual VPC private addresses. Do not expose the Kubernetes API or node ports to 0.0.0.0/0 unless you add authentication and hardening.
Ports and Protocols (Reference)
Kubernetes uses fixed ports for the API server, etcd, kubelet, scheduler, and controller manager. The authoritative list is in the official docs: Ports and Protocols. The tables below align with that reference for a kubeadm-style cluster.
Control plane (master):
| Protocol | Direction | Port | Purpose |
|---|---|---|---|
| TCP | Inbound | 6443 | Kubernetes API server |
| TCP | Inbound | 2379-2380 | etcd server client API |
| TCP | Inbound | 10250 | Kubelet API |
| TCP | Inbound | 10257 | kube-controller-manager |
| TCP | Inbound | 10259 | kube-scheduler |
Worker nodes:
| Protocol | Direction | Port range | Purpose |
|---|---|---|---|
| TCP | Inbound | 10250 | Kubelet API |
| TCP | Inbound | 10256 | kube-proxy |
| TCP | Inbound | 30000-32767 | NodePort services |
| UDP | Inbound | 30000-32767 | NodePort services |
Security Groups
Restrict traffic so that only the necessary ports are open between master, workers, and your access point (e.g. your IP for SSH).
Master security group
Create a security group (e.g. k8s-master-sg) and use it for the master node. Example inbound rules:
| Type | Port | Source | Purpose |
|---|---|---|---|
| SSH | 22 | Your IP (or VPN CIDR) | SSH access |
| TCP | 6443 | Worker security group | Kubernetes API server |
| TCP | 10250 | Worker security group | Kubelet API |
| TCP | 10257 | Same security group (self) | kube-controller-manager |
| TCP | 10259 | Same security group (self) | kube-scheduler |
| TCP | 2379-2380 | Same security group (self) | etcd |
Outbound: allow all (e.g. 0.0.0.0/0) so the control plane can pull images and reach the internet if needed.
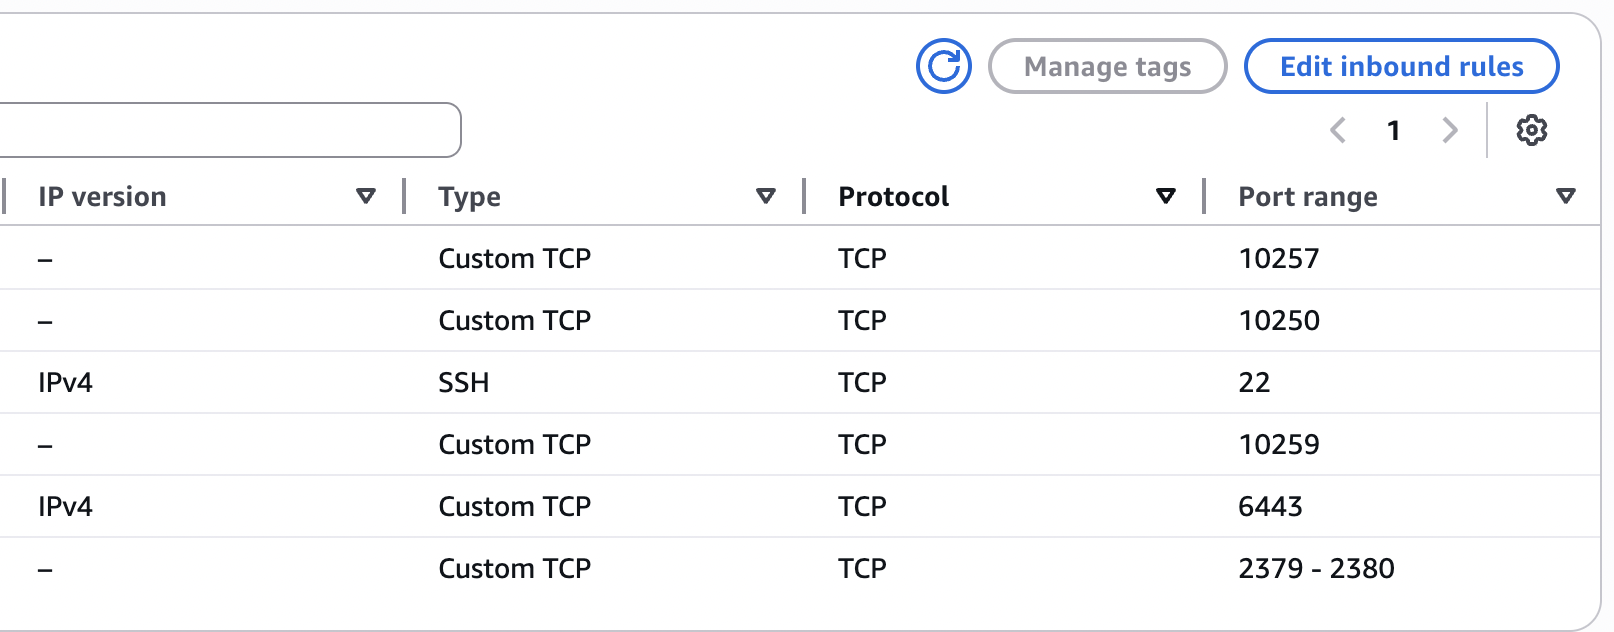
Example: master security group inbound rules.
Worker security group
Create a second security group (e.g. k8s-worker-sg) and attach it to both worker instances. Example inbound rules:
| Type | Port | Source | Purpose |
|---|---|---|---|
| SSH | 22 | Your IP (or VPN CIDR) | SSH access |
| TCP | 10250 | Master security group | Kubelet API |
| TCP | 30000-32767 | 0.0.0.0/0 (or your LB/users) | NodePort services |
| All traffic | All | Same security group (self) | Node-to-node (e.g. pod networking) |
Outbound: allow all (e.g. 0.0.0.0/0).
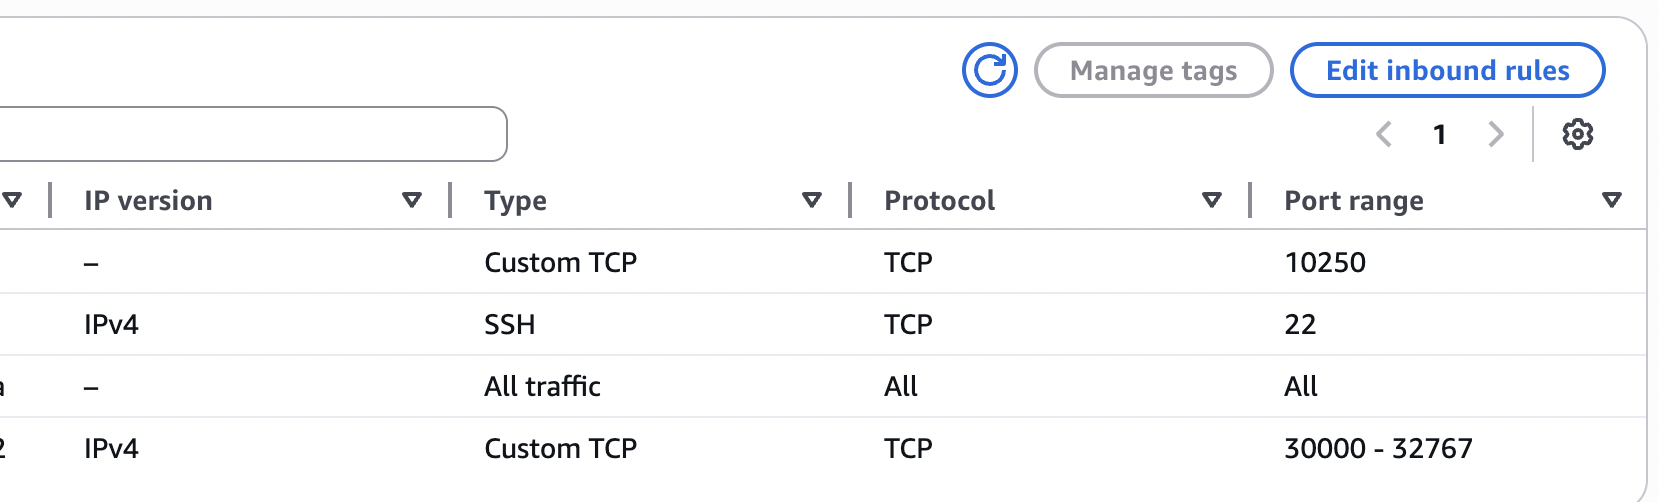
Example: worker security group inbound rules.
If you prefer not to open NodePort range to the internet, restrict the source to a load balancer or your VPN CIDR and use an Ingress or LoadBalancer service in front.
System Preparation (All Nodes)
Run these steps on every node (master and workers) after first boot.
Disable swap
Kubernetes expects swap to be off.
sudo swapoff -a
sudo sed -i '/ swap / s/^/#/' /etc/fstab
Load kernel modules
cat <<EOF | sudo tee /etc/modules-load.d/k8s.conf
overlay
br_netfilter
EOF
Enable bridge and forwarding
cat <<EOF | sudo tee /etc/sysctl.d/k8s.conf
net.bridge.bridge-nf-call-iptables = 1
net.ipv4.ip_forward = 1
net.bridge.bridge-nf-call-ip6tables = 1
EOF
sudo sysctl --system
Container Runtime: containerd
Install and configure containerd on all nodes.
sudo dnf install -y containerd
sudo systemctl enable --now containerd
Generate a default config and restart:
sudo containerd config default | sudo tee /etc/containerd/config.toml
sudo systemctl restart containerd
Install Kubernetes Components (All Nodes)
Add the Kubernetes package repository (example for v1.29; adjust version as needed):
cat <<EOF | sudo tee /etc/yum.repos.d/kubernetes.repo
[kubernetes]
name=Kubernetes
baseurl=https://pkgs.k8s.io/core:/stable:/v1.29/rpm/
enabled=1
gpgcheck=1
gpgkey=https://pkgs.k8s.io/core:/stable:/v1.29/rpm/repodata/repomd.xml.key
EOF
Install kubelet, kubeadm, and kubectl:
sudo yum install -y kubelet kubeadm kubectl
sudo systemctl enable --now kubelet
Initialize the Control Plane (Master Only)
SSH to the master node and run:
sudo kubeadm init --pod-network-cidr=10.244.0.0/16The --pod-network-cidr is for Flannel’s default range. If you use a different CNI, check its documentation for the correct CIDR.
When kubeadm init completes, it prints a join command with a token and discovery hash. Copy that command; you will run it on each worker. Do not share the token in public repos or docs. Store it in a secret manager or run the join command once per worker and rotate tokens if needed.
Configure kubectl on the master:
mkdir -p $HOME/.kube
sudo cp /etc/kubernetes/admin.conf $HOME/.kube/config
sudo chown $(id -u):$(id -g) $HOME/.kube/config
Install CNI: Flannel
On the master, apply the Flannel manifest:
kubectl apply -f https://github.com/flannel-io/flannel/releases/latest/download/kube-flannel.ymlWait until the master node is Ready:
kubectl get nodesYou should see the master in Ready state.
Join Worker Nodes
On the master, generate a new join command (optional; you can reuse the one from kubeadm init):
kubeadm token create --print-join-commandOn each worker, run the join command (replace MASTER_PRIVATE_IP, token, and hash with your values):
sudo kubeadm join MASTER_PRIVATE_IP:6443 \
  --token <TOKEN> \
  --discovery-token-ca-cert-hash sha256:<HASH>
After both workers have joined, from the master run:
kubectl get nodes -o wideYou should see all three nodes in Ready state.
Verify the Cluster
Check system pods:
kubectl get pods -AYou should see kube-apiserver, kube-controller-manager, kube-scheduler, and etcd on the master, and kube-proxy and flannel (or kube-flannel-ds-*) on all nodes. CoreDNS pods usually run on the master or workers and should be Running.
Test with a Sample Workload
Create a deployment and expose it with NodePort:
kubectl create deployment nginx --image=nginx
kubectl expose deployment nginx --type=NodePort --port=80
Get the NodePort:
kubectl get svc nginxIn the output, note the port in the 30000-32767 range. From a machine that can reach your workers (e.g. your laptop, if NodePort is open to your IP), open:
http://WORKER_PUBLIC_IP:NODEPORT
You should see the default nginx page. Use a worker’s public IP only for this test if your security group allows it; in production you would front this with a load balancer or Ingress and restrict NodePort source.
Versions Used (Example)
| Component | Version |
|---|---|
| Kubernetes | v1.29.x |
| Container runtime | containerd |
| CNI | Flannel |
| OS | Amazon Linux 2023 |
What You Practiced
- Bootstrapping a cluster with kubeadm (control plane + join)
- Using containerd as the container runtime
- Configuring Flannel for pod networking
- Restricting cluster and SSH access with AWS security groups
- Aligning inbound rules with Kubernetes ports and protocols
- Using cloudping.info to choose an AWS region for lower latency
- Exposing a service via NodePort and verifying connectivity
Next Steps
Once the cluster is stable, you can:
- Install an Ingress controller (e.g. NGINX) and define Ingress resources
- Add Prometheus and Grafana for metrics and dashboards
- Use Helm to deploy and version applications
- Consider Cluster Autoscaler if you scale worker groups
- Harden the cluster (restrict NodePort source, RBAC, network policies)
Beyond a single control plane
This guide uses one master node for clarity and direct control over the cluster. That is not the only option. For production and high availability, you can run multiple control plane nodes (for example, three) plus a pool of workers. Leader election and quorum are then handled among the control plane replicas, so the cluster tolerates the loss of a control plane node without losing the API or scheduler.
At the other end of the spectrum, HyperShift on OpenShift takes a different approach: control planes run as workloads inside a management cluster, with worker nodes decoupled and often in separate infrastructure. HyperShift is middleware for hosting OpenShift control planes at scale. It addresses cost and time to provision, as well as portability across clouds, with a clear separation between management and workloads. Hosted clusters are fully compliant OpenShift Container Platform clusters and work with standard OCP and Kubernetes tooling. Whether you stay with a traditional multi-node control plane or move toward a hosted model like HyperShift depends on your control plane budget, operational model, and how much you want to centralize management versus keep clusters self-contained.
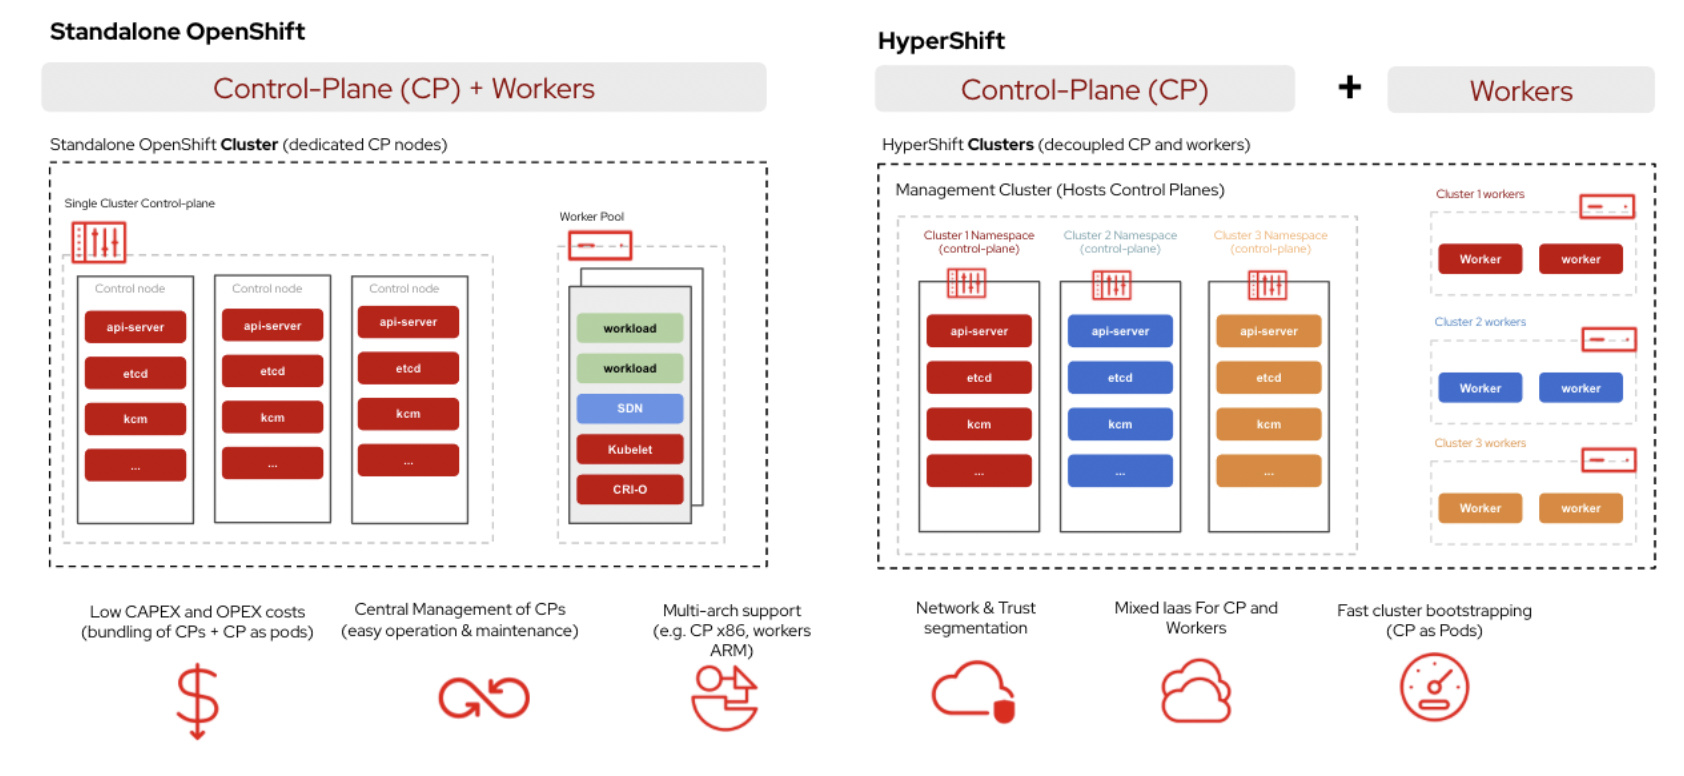
Standalone OpenShift (dedicated control plane nodes) vs HyperShift (control planes as pods in a management cluster, workers decoupled).
References
- Kubernetes: Ports and Protocols
- cloudping.info – measure latency to cloud regions
- kubeadm: Creating a cluster
- Flannel – CNI for Kubernetes
This setup gives you a working 3-node cluster on AWS EC2 with clear security group rules and a path to add monitoring, Ingress, and scaling later.